How to Take a Photo of the Moon: The Fullest Guide
December 19
11 min. to read
 No matter where you are in the world, you can see the moon, and as a photographer, capturing it feels like being part of something bigger. It also tests your photography skills as, although the moon is a fascinating subject, it takes knowledge to capture it. In this blog, I share the tips you need to know to capture the timeless beauty of the moon and create an emotional impact with your photos.
You may also like: Night Photography Tips: The Ultimate Guide
Step 1. Understand the Moon as a Subject
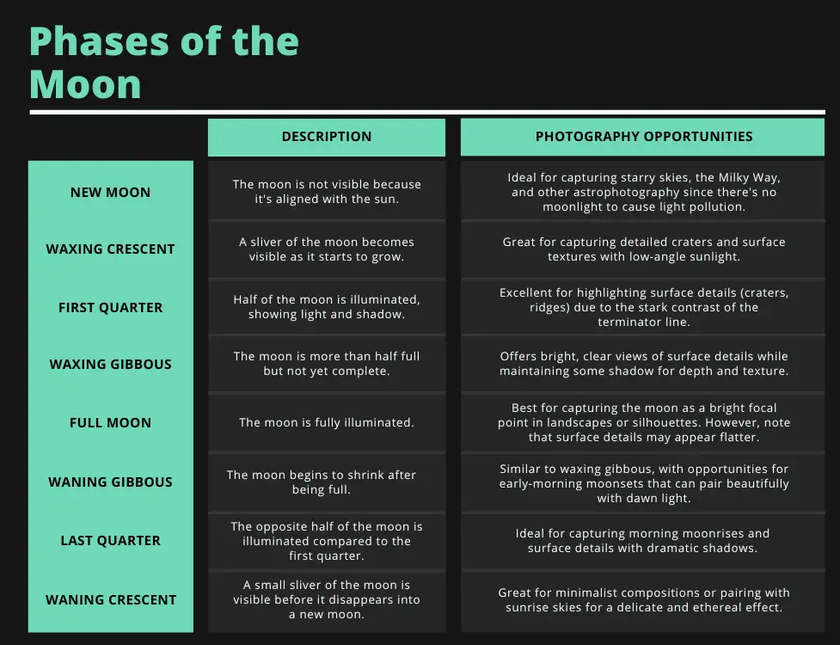
Phases of the Moon
Understanding the different phases of the moon is important if you're planning to photograph it, as each phase offers unique lighting and textures.
 Best Times to Photograph the Moon
1. Moonrise and Moonset: The moon, low on the horizon, appears larger and can be part of wide compositions, including foreground elements such as landscapes, buildings, and silhouettes.
2. Golden Hour and Blue Hour: The Golden Hour light blends nicely with the moon, and the Blue Hour tones contrast with the bright moon, especially during crescent or half phases.
3. At Night, with the moon high in the sky: The moon is brightest when it is high, perfect for isolated moon shots.
4. Celestial events: During supermoons, the moon is closest to the Earth, so it appears larger and brighter. During Lunar Eclipses, the Earth's shadow covers the moon, creating a red "blood moon." These rare and unique events are great opportunities to capture dramatic visual effects.
Weather Conditions
Good weather conditions are critical when capturing the moon. Clear skies are ideal as they allow the moon to stand out against the background, showcasing its natural tones vividly and accurately. On the other hand, clouds can easily obscure the moon or create uneven light, making it nearly impossible to get a good shot. High humidity and haze can also blur the moon's surface, so you want clear and crisp air to minimise atmospheric interference and capture the craters and textures of its surface.
Step 2. Gather the Right Gear for Moon Photography
Cameras
DSLR Cameras are ideal as they offer manual control over settings like ISO, shutter speed, and aperture, and they are compatible with telephoto lenses to capture detailed shots of the moon's surface.
Mirrorless Cameras are lightweight and offer advanced features like in-camera stabilisation and electronic viewfinders for better focusing. They can also be used with telephoto or super-telephoto lenses for high detail. They are ideal for enthusiasts and professionals looking for convenience.
Find out more: Mirrorless vs DSLR: How to Choose the Right Camera for Your Needs
Compact Cameras with Superzoom are a good option as well. They can offer built-in superzoom lenses and are affordable and beginner-friendly. However, they can't capture as many details as DSLR or mirrorless cameras, especially in low light. Compact cameras are suitable for beginners or casual photographers who want to photograph the moon without investing heavily.
Smartphone cameras can also be used to capture the moon. The most recent models offer powerful sensors and AI-assisted features, but they are limited in terms of zoom capabilities, and it is difficult to capture fine details. They are a good alternative for quick and creative moon shots, especially for social media.
Lenses
With their long focal lengths, Telephoto Lenses allow you to zoom in on the moon and capture details like craters and textures.
Super Telephoto Zoom Lenses offer extreme zoom ranges, so they can be used for close-ups of the moon and wider compositions.
Wide-Angle Lenses are useful to capture the moon as part of a broader scene, such as a landscape or cityscape.
Standard Zoom Lenses are versatile lenses that can be used for everyday photography while still offering some zoom capabilities. However, this type of lens may not have enough reach to capture the moon's details.
Tripod and Remote Shutter Release
Whether you are a beginner or an advanced photographer, you need a tripod to capture sharp, clear and high-quality shots. I also recommend a remote shutter release to avoid touching the camera when pressing the shutter button and, therefore, minimise any camera shake to the maximum.
Step 3. Prepare for Your Moon Photography Session
Location
Before the shot, make sure that you scout the location you have in mind to visualise your composition and be familiar with elements that you could incorporate in your shot, such as mountains, buildings or trees. You also can evaluate the light pollution and obstructions.
Apps
There are a number of apps you can use to track the moon's rise and positioning and prepare your shot. You can try PhotoPills, Stellarium, SkySafari, Moon Gazer, Moon Tracker or Lunar Phase Pro depending on your preferences.
Settings
If you want to capture a sharp and well-exposed image of the moon, you have to have the correct settings. Here is what I recommend to get started:
- Manual Mode
- Aperture: f/8 to f/11
- Shutter Speed: 1/125s to 1/250s
- ISO: 100 to 400
- White Balance: Daylight or Auto
- Exposure Compensation: -1 to -2 stops
Find out more: Photography Cheat Sheet: Manual Mode Camera Settings Explained
These settings are only to get you started. Feel free to adjust them depending on the conditions you're shooting in.
Step 4. Learn Some Techniques for Capturing Moon Photos
Single shots are best to achieve sharpness and details. They are simple and quick and are ideal if you want to focus solely on the moon.
HDR Photography is also a great technique you can use to capture the moon. It involves taking multiple photos at different exposure levels and combining them into one image. HDR is best for high-contrast environments.
To create an image that is more dynamic and engaging, experiment with foreground elements: landscapes (mountains, deserts, forests, etc.), silhouettes (trees, buildings, people, animals, etc.), architecture (ruins, bridges, towers, etc.), bodies of water (lakes, rivers, oceans, puddles, etc.), man-made objects (windmills, streetlights, cars, etc.) or foreground interests (flowers, grass, rocks, etc.).
If you feel creative, create composite images by combining your photos of the moon with other elements from different shots. This can be done in post-processing. For example, you can create a picture of a landscape with the moon in various phases or positions.

Step 5. Enhance Your Moon Photos with Post-Processing
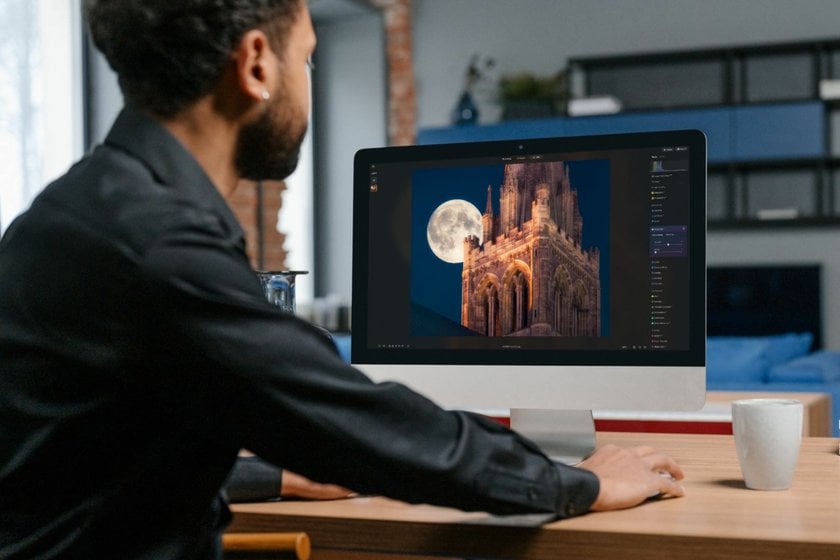
Luminar Neo is an excellent and easy-to-use software that allows you to enhance your photos, making sure that the moon and any foreground elements are perfectly balanced.
1. RAW Processing: Use Develop RAW to adjust exposure, contrast and white balance. The moon can often be overexposed, so you can adjust the exposure slider to bring out more details. Adjust the highlights to recover any overexposed parts of the moon's surface.
2. Enhancing the Moon's Details: Use the Structure AI and Details tools to improve the texture and sharpness.
3. Working with the Foreground: If you need to adjust the foreground differently from the moon, use Luminar Neo's Masking tools, such as the Brush tool, Linear Gradient or AI Masking.
4. Color Grading: Use the Color tool to adjust the vibrance and saturation of the colors, especially if you're shooting a moonrise or a moonlit landscape. Adjust the HSL (Hue, Saturation, Lightness) sliders to fine-tune specific color tones in the sky and foreground.
5. Noise Reduction: Noiseless AI cleans up any unwanted grain on your image.
6. Sharpening and Final Touches: At the end of your edit, use the Sharpness tool to the overall image to enhance details. You can also add a subtle vignette to draw the focus to the moon, your main subject.
Your Solution for Effortless RAW Image Transformation
Apply it Now!Conclusion
Capturing a beautiful photo of the moon is always rewarding for any photographer, beginner or advanced. You can capture breathtaking images by choosing the right gear and settings and trying different techniques. Remember, every phase of the moon offers unique characteristics, so don't be afraid to experiment. And with post-processing tools like Luminar Neo, you can take your photos to the next level. Most importantly, keep practising, and let the moon inspire your creativity!


 Best Times to Photograph the Moon

