How to Compress an Image Without Losing Quality
May 23
10 min. to read
 Our digital cameras, and yes, even our smartphones, capture high-resolution images with file sizes often in the double-digit megabyte range. And we want that. Those millions of pixels allow us to display our photographs on large monitors, make big prints, and crop out portions of the photo and still have enough visual information for a crisp image.
But there are instances when we want to compress those files to take up less space on our storage devices, or to make them easier to send to others electronically. In those situations, you can make compressed copies of your files in Luminar Neo, by following these steps. And in fact, Luminar Neo is one of the best easy photo editing software.
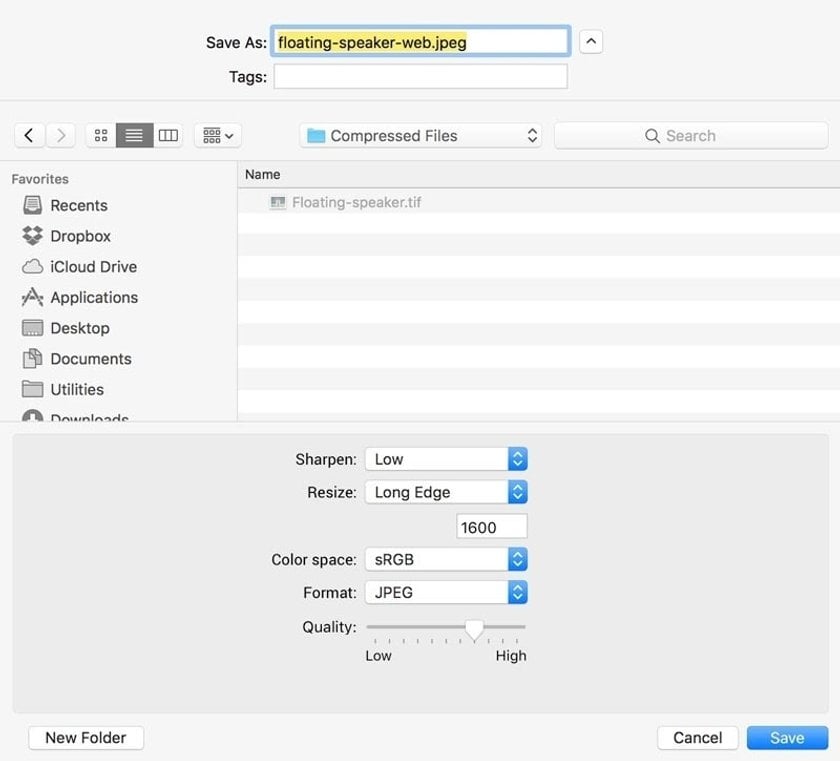
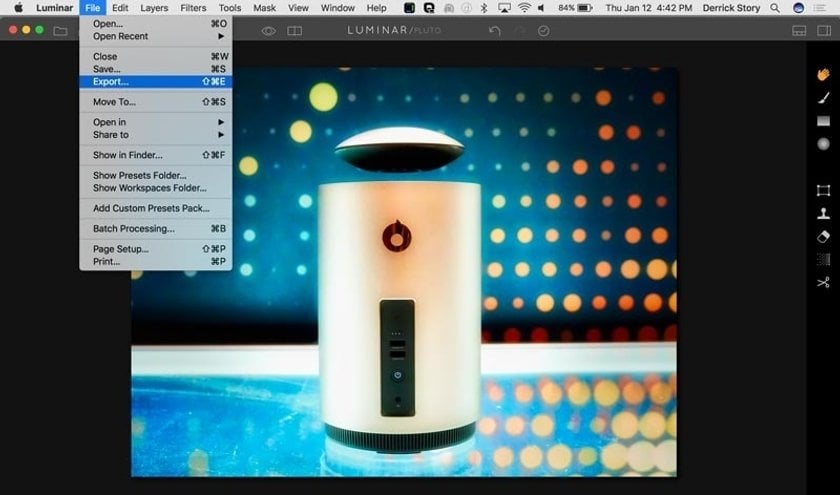 So, how to condense photo file size? Once you've finished editing in the Luminar Neo standalone application, go to File > Export. You'll be greeted with a dialog box displaying five file options for changing the file characteristics, plus the ability to create a name for the image and choose the location for saving it.
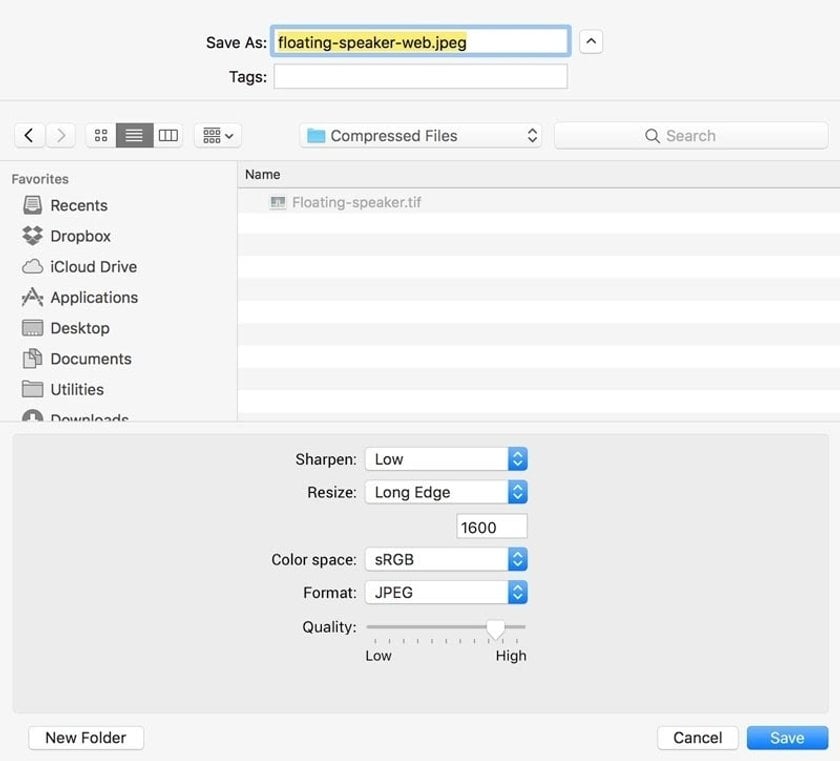 When choosing the name, I recommend that you indicate that this is a compressed file by adding a word such as, "web" or "share". This will help you quickly distinguish your compressed files from the masters.
By the way, you may just need to organize your photos and delete unnecessary ones. Check out our blog to find the best photo organization software for you.
How to Compress Image Files: Sharpening
 Now let's take a look at the lower part of the dialog box. The first option is for sharpening. Generally speaking, when we resample an image, that is, make it bigger or smaller than its original size, there is some loss of sharpness. By adding a little sharpening during the resampling process, we can offset that loss and maintain the integrity of the photograph. I recommend using Low or Medium for output sharpening.
How to Compress Photos: Resize
When you click on the Resize popup menu, four options appear: Original, Long Edge, Short Edge, and Dimensions. Choosing the Original keeps the current dimensions of the image. Generally speaking, if you want to resize the photo and make the file size smaller, you should change the dimensions so they are smaller. So Original is an unlikely option for this task.
 Long Edge and Short Edge are the most common choices. For example, you can make your image no bigger than 1600 pixels on the longest or shortest side, and the Luminar Neo photo editor will reduce the entire image accordingly.
Dimensions can be helpful if you know the exact size you want the compressed image to be. If that's the case, enter the values for both sides.
How to Compress a Picture File: Color Space
 This isn't related to compression per se, but if you know the final destination for your photo, choose the appropriate color space. For electronic display, select sRGB. For printing choose Adobe RGB or ProPhoto RGB.
And if you want to make your best shots look incredible, there is a really great solution. Try using photo editing presets for Luminar Neo or Lightroom.
How to Compress Photo Size: Format
 The Format popup menu presents no less than seven options. For this project, choose JPEG. It is the most common compressed format. And it can be opened on practically any device or with any software that supports images.
How to Compress Image: Quality
On this scale, the lower the quality setting, the smaller the file size. Photographers try to find the perfect balance between fewer bytes and acceptable image display. I recommend that you set quality between the halfway point and the 3/4 point on the scale. This will still give you plenty of compression without degrading the quality of its appearance.
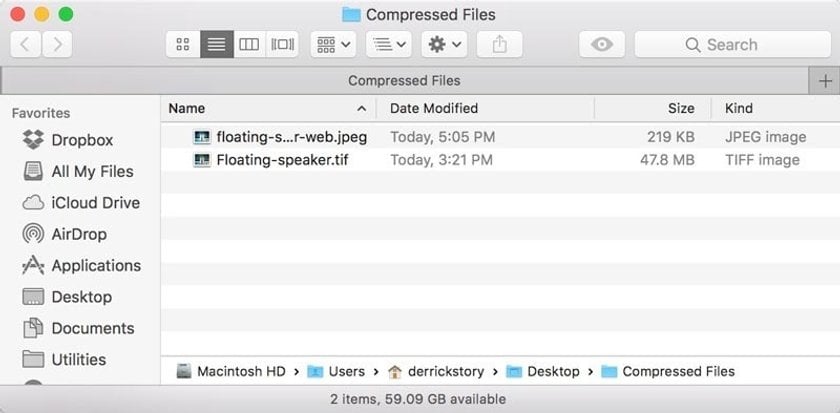
 Once you've made your selections, click the Save button. A compressed copy of your file will be placed in the location you set in the dialog box. In the case of our floating speaker photo, we went from a 47.8 MB Tiff file all the way down to 219 KBs for the compressed copy.
How to Reduce the Size of a Picture in Paint
Reducing the size of a picture in Microsoft Paint is a simple process. Follow these steps:
1. Open the Picture in Paint
In the Start menu, search for "Paint" and open it. To choose the picture you want to resize, click on File > Open in the application.
2. Access the Resize Tool
Go to the Home tab and click on the Resize button in the "Image" group.
3. Choose Resize Options
In the Resize and Skew dialog box, choose whether you want to resize by percentage or pixels. Ensure the Maintain aspect ratio checkbox is checked to keep the picture's proportions the same.
4. Enter New Dimensions
If resizing by percentage, enter the percentage values in the Horizontal and Vertical boxes.
If resizing by pixels, enter the desired dimensions in the Horizontal and Vertical boxes.
5. Apply and Save
Click OK to apply the new size to your picture. Then, click File > Save As to save the resized picture. Choose a new file name if you want to keep the original picture intact.
FAQ
How Do I Reduce the MB Size of a Photo?
An effective way to reduce the file size of an image is to increase the compression level. In several image editing apps for Windows and Mac and online platforms, you can adjust it by selecting certain options in the Save As or Export As dialog box when you save the file in PNG, JPG, or GIF format. However, it's important to note that a higher amount of compression can result in a loss of image quality. It's very important. So, find the lossless compression option when adjusting your settings.
How Do I Reduce the Size of a JPEG?
This is a widely used photo file that uses lossy compression, which allows for significant size reduction but can result in some reduction in picture clarity. When you export an image to JPG format from an image editing software like Photoshop, you usually can select the quality of the image. To determine the optimal level, use a strategy of starting with a relatively high-quality setting and evaluating the photo. If the picture looks good, you can try gradually lowering the clarity to further reduce the file size and compress an image.
How Do I Compress a Large Picture to Zip It?
To make a zipped folder from a file, press and hold the selected image (or right-click it), then hover over the "Send to" option and choose "Compressed (zipped) folder". This will create a new zipped folder with the same name as the original file in the same location.
How to Compress Pictures for Email?
To compress a picture and upload it to email, you can resize the photo to make it smaller. A good rule of thumb is to keep the width or height of the image under 1000 pixels. Also, most editing software allows you to adjust the compression level when you save the photography. Choose a medium or high setting to maintain good picture sharpness while reducing file size.


