How To Add LUTs To Davinci Resolve And Adobe Premier Pro
September 25, 2024
Learn how to add LUTs to DaVinci Resolve and Adobe Premiere Pro. Elevate your video projects with our comprehensive tutorial and expert advice.
Colors are the most powerful instruments in redefining the mood of your visual content. Whether you are aiming to create a cinematic look, a moody atmosphere, or simply correct color inaccuracies, LUTs (Look-Up Tables) are included in most prominent photo editing apps like Luminar Neo, Photoshop, and Lightroom to help you with color adjustments.
The photography LUTs are presets specifically focused on color grading. They allow photographers to apply consistent color grading across the whole footage. LUT is a mathematical formula that modifies the color values of your footage. Instead of manually tweaking the hues, contrast, or saturation in every shot, these tables apply a specific look to all the shots in one click.
There are different types of LUTs, but two of the most common are technical and creative. The technical tables are used to convert camera-specific log profiles to a standard color space. The creative ones are applied for a unique aesthetic, such as sepia filters, vibrant color grading, or a cinematic feel.
Make Your Visuals Spectacular with the Cinematic LUTs Bundle
Get it nowUsing LUTs in editing software like DaVinci Resolve and Adobe Premiere Pro is an essential skill to master, as manual color grading takes hours of time and effort. This guide explains how to import LUTs in Premiere Pro and how to use LUTs in DaVinci Resolve to turn your footage into stunning visual content.
LUTs in Adobe Premiere Pro
How to Install LUTs in Premiere Pro
Open Premiere Pro and load your project. Once it is on the timeline, select a clip you would like to modify.
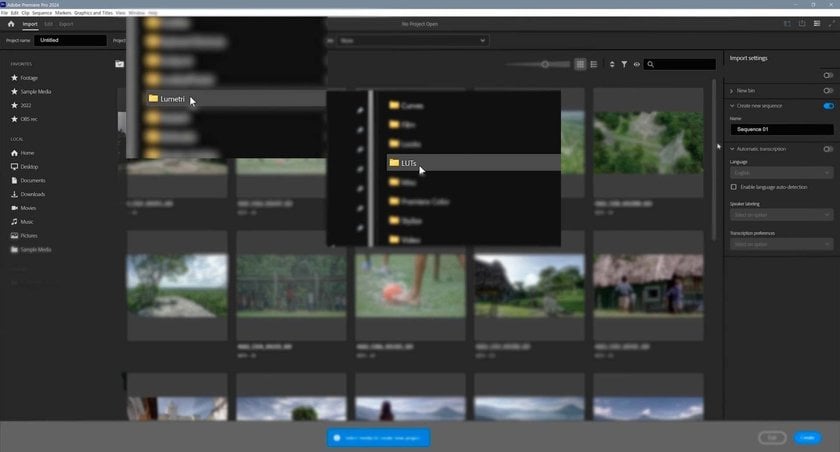
Go to the Lumetri Color Panel. If you do not see it, navigate to Window > Lumetri Color.
Choose the Basic Correction dropdown. Under the section labeled “Input LUT,” you will see a dropdown menu. This menu includes pre-installed tables from which to choose.
If you want to use a custom table, choose Browse and specify the folder where it is located (usually a .cube or .look file). Once you select the table, it will be applied to your project automatically.
Application
Importing your own look-up table adds a personal touch to your projects. Premiere Pro offers flexibility for visual content in different styles and genres, whether you want to achieve consistency across your photos or experiment with creative tools like filters for pictures and complex video projects.
When you import a look-up table, the changes in colors are visible immediately, but this is only a starting stage. Use the other sliders in the Lumetri Color panel to fine-tune your image. Adjust exposure, contrast, highlights, and shadows. Ensure the final results match your creative intentions. Apply a LUT under the Creative section for more advanced modification. It combines look-up tables and layering for unique grading and seamless blending.
LUTs in DaVinci Resolve
 How to Install LUTs in DaVinci Resolve
 How to Install LUTs in DaVinci Resolve
Open DaVinci Resolve and create or load your project. Navigate to the bottom part of the interface. Find the Color panel.
On the left, click on the LUTs panel. DaVinci Resolve provides a wide range of built-in look-up tables.
If you want to add your custom tables, right-click in the LUT panel and select Open LUT Folder.
Open the directory where the custom .cube or .3dl files are located. Drag and drop them into the LUT folder.
Once added, right-click again and select Refresh. Your tables should now appear in the list, ready for use.
How to Apply LUTs in DaVinci Resolve
 Once the color grading presets are installed, you can easily access them whenever you need. In the Color tab, right-click on the Node Graph area and select Add Node > Add Serial Node. It preserves the original file, allowing you to experiment with different edits without risking altering the photo or video permanently.
With the new node selected, go to the LUTs panel and click on your preferred color preset. The changes will be visible in the viewer window immediately. Use DaVinci’s built-in controls to adjust parameters like saturation, contrast, and temperature. This step is paramount for creative look-up tables, like photo filters or mood-driven color grading (monochrome, sepia, etc.).
For more precise control, consider using parallel nodes to layer multiple LUTs and achieve unique color blends. DaVinci Resolve’s node-based system offers unparalleled flexibility. You can combine multiple presets and apply adjustments without risking irreversibly changing the original file. The program’s robust capabilities make it a favorite among professional photographers, videographers, and hobbyists alike, whether working on high-end video projects or maintaining a consistent look across social media pages.
Install the Cinematic LUTs Bundle to Enhance Your Visuals
Discover moreCommon Mistakes to Avoid
 While LUTs are incredibly useful for speeding up the color grading process, there are common pitfalls that can lead to less-than-ideal results. Understanding these mistakes will help you avoid challenges and ensure a polished and cohesive look.
One of the most frequent errors is over-relying on LUTs. LUTs are not a one-size-fits-all solution. Every look-up table should be readjusted according to every particular footage. Every clip has different lighting, contrast, and color balance, so you should always tweak the setting after applying a LUT. Otherwise, you will get an unrealistic and artificial look, destroying your project’s visual appeal. Adjust the exposure, shadows, highlights, and contrast. Ensure the preset complements your visuals instead of overpowering them.
Another common mistake is misusing technical LUTs. Applying them for creative purposes is irrational and potentially harmful to your pictures. Technical LUTs are designed to convert log footage into a standard color space. They should not be considered final color grades, especially in creative projects, where the colors’ impact on the viewers’ visual perception is paramount. The creative look-up tables should be applied on top of the technical ones. If you skip this step, you may end up with inaccurate colors that are difficult to correct later.
Do not neglect to calibrate your monitor before applying presets. If your monitor is not correctly calibrated, the colors you see on the screen may not reflect how they will look on other devices. It can lead to inconsistent results. Calibration can make or break its visual appeal and emotional impact if you deliver your content across different platforms and devices.
Lastly, applying the wrong color scheme for your project can destroy the entire visual mood. For example, using sepia filters meant for vintage effects in a futuristic photoshoot or a sci-fi video can confuse the viewers. Be mindful of the story you want to tell, the emotions you want to evoke, and the message you want to convey. Look-up tables should enhance your visual storytelling, not detract from it.
Best Practices for Using LUTs in Different Projects
 For cinematic projects, using creative LUTs that mimic the color palettes of popular films can set the mood right from the start. For instance, if creating a drama, warm tones or desaturated color schemes can amplify the emotional weight of a scene. In contrast, high-contrast and cooler tones are often used for action or sci-fi genres. They convey tension and intensity.
In corporate photos and videos, prioritize subtle, neutral, and realistic color schemes. Ensure the tones do not overpower the intended message. Stick with natural color correction that gives the footage a clean, professional look. Let your content shine through the polished finish without making the shots appear excessively stylized.
For social media or content creation, experiment with photo filters and vibrant presets. These LUTs can help make your photos and videos stand out in fast-scrolling feeds. They deliver a striking and appealing look. Bold, saturated colors can add creative flair while maintaining consistency across posts and platforms.
Conclusion
Mastering the use of LUTs in DaVinci Resolve and Adobe Premiere Pro can significantly streamline your editing process. By integrating these tools into your creative workflow, you open up a world of creative possibilities, from basic color corrections to advanced cinematic grading.
Whether working with photography LUTs or experimenting with intricate video projects, knowing how to apply these tools can significantly boost your creations’ impact and quality. With the useful information and practical tips shared in this guide, you're well-equipped to make your next visual project striking and meaningful.