Exploring Luminar Neo: A Guide to Layering, Watermarking, and Beyond
June 12, 2024

Get ready to discover how to effortlessly place your watermark on a photo, automatically include it in all your other photos, and make the most out of Layers functionality.
Layers can play a big role in your photo editing workflow, so knowing all the possibilities is important! That's why we've prepared this quick tutorial. In it, you'll find answers to the following questions:
How to add a watermark to your photo in just 4 steps
What the Sync Adjustments feature is and how to use it for batch processing
How to utilize Luminar Neo’s layers panel to the fullest
We hope you’re excited to get the answers as soon as possible, so let's get started!
1. How to Add a Watermark to a Photo
When you edit your picture and post it online, you might want to add a watermark for copyright protection, acknowledgment, or other reasons.
Here’s a step-by-step guide on how to place a watermark on your photo with Luminar Neo:
Step 1: Starting the Process
Open your photo and locate Layers panel in the top left corner of the Edit tab.

Step 2: Adding the Watermark Image
Click on the “+” (plus) sign under My Images to load your watermark/logo in Luminar Neo. In the window that pops up, find your file and click Open.
Step 3: Working with the Layer Properties
By default, the image is placed in the center of your photo with 50% opacity. Resize your watermark by dragging the corners and set the opacity to 100%.
Step 4: Final Touches
Find a good spot for your watermark—make sure it’s visible but doesn’t draw too much attention away from your photo. Once you’ve found the right spot, you’re all set! Your photo now has a personal watermark added!
2. What is “Sync Adjustments” and How to Use it
After editing your photo and adding a watermark, you can sync adjustments with other photos for batch processing. How does it work? Syncing adjustments will copy all your edits, including not only the Layer with the watermark but also all the other edits from different tools. If you want to edit your photos differently but have the same watermark on them, it’s best to copy and paste adjustments only with the watermark first and do all the edits afterward. Quite a handy feature, isn't it?
- Important: Please note that edits from tools such as Crop AI, Erase, and Background Removal AI cannot be synced, so you would have to apply these tools to each photo individually if needed.
When you are ready to sync adjustments, follow these steps:
Step 1: Choose a Sample Image
In Catalog mode, click on the edited photo that you wish to use as a reference for synchronizing all other photos. It will appear outlined with a yellow rectangle border.
Step 2: Select Photos to Edit
By holding Shift for multiple photo selections in a row or Ctrl for selecting individual photos, choose the photos where you want to apply the adjustments from the main photo. The selected photos will have a white rectangle border around them.
Step 3: Apply Sync Adjustments
Click on any of the selected photos and choose Adjustments > Sync Adjustments, or use the hotkey combination of Ctrl+Shift+S on Windows or Shift+Cmd+S on macOS.
Step 4: Final Touches
Wait until the photos are synced—the thumbnails may need some time to update with the correct preview. And there you go, you're done! The adjustments from the main photo have been applied to all the selected photos. Now, you can continue editing the photos individually or export them if they are ready.
A Little Trick from the Skylum Team
In the Adjustments drop-down menu, you can also find Copy/Paste Adjustments. It works similarly to Sync Adjustments, but you need to manually copy the adjustments from one picture and paste them onto another. This functionality is convenient if you are not yet sure which photos you want to select for adjustment synchronization.
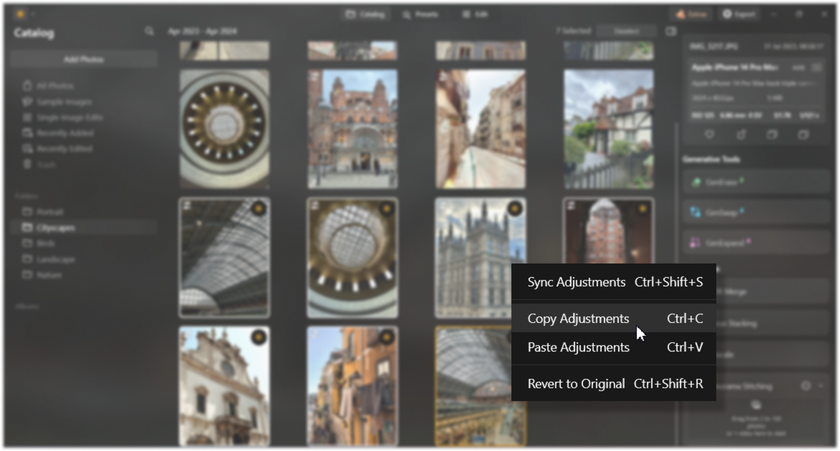
If you are not satisfied with the result of synchronized adjustments on other photos, you can quickly revert the changes by clicking on the photo and selecting Adjustments > Revert to Original (or using the hotkey combination of Ctrl+Shift+R on Windows or Shift+Cmd+R on macOS).
Overall, Sync Adjustments is a great way to save time and quickly add some basic adjustments to a series of similar photos.
Optimize Your Workflow with a Batch Image Enhancer
I'm in!3. What Else Can You Do with Layers: An Overview
Using Layers, you can add overlays to your photo, such as flares, light leaks, bokeh, sparkles, and many other effects. Layers are a powerful tool for creative image editing. With this tool, you can not only add various objects but also create effects that will bring your picture together.
In Luminar Neo, the Layers panel is located on the left side of the work space. As shown in the picture below.
To edit these layers, we need to move to the right side and find Layer Properties. Here, you can find everything you need to set up your layer for the best appearance in your photo, depending on the purpose of the image in the layer. 
Below, we'll explore all the Layer properties you can find in Luminar Neo and show you how to use them. Spoiler alert: it's not that hard!
Opacity
Opacity regulates the transparency of the layer. If you’re using Layers to add an object or a watermark, keep the value at 100%. However, you can play with opacity levels if you want to add some effect to your image using layers, making it ghostly, shady, or half-transparent. The lower the opacity, the less visible your layer becomes.
Blend Modes 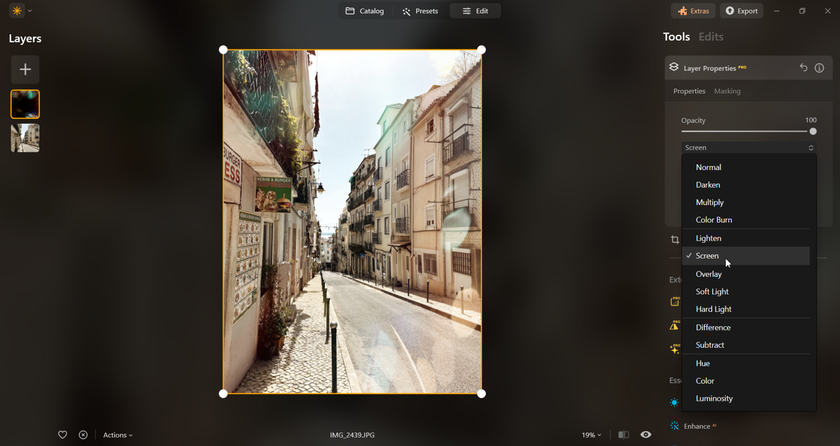

Blend Modes allow you to blend your layer with the rest of your image. With the right blend mode, you can achieve an amazing, flawless look.
Here are all the Blend Modes explained:
Blend Mode | Description |
| Default non-transparent mode, which keeps the layer visible over anything behind the layer. |
| Amplifies dark colors in your photos, influencing the image's dark parts. |
| Amplifies light colors in your photos, influencing the image's light parts. |
| Enhances the contrast between the layer and the base image. |
| Inverts (as in negatives) white and light colors, creating a comparative effect. |
| Defined by colors to play with hues, saturation, and brightness to help bring your photo to life using the layer. |
Horizontal/Vertical Flip
 This feature mirrors your image horizontally or vertically by flipping the content from top to bottom or from left to right and vice versa.
Image Mapping
There are 3 options that you can use to quickly adjust your Layer’s size in comparison to the main image:
1 – Fit
This option fits the Layer to the borders of your photo so that the fitting Layer is inside the picture and completely visible.
2 – Fill
This option fills your image with the Layer, so if the Layer is smaller than the image, it will fill it anyway to cover everything fully.
3 – Stretch
This option stretches your Layer to match the photo’s size, even if it means that the Layer itself will get deformed because of different dimensions. 
- Helpful tip: You can also hide/unhide a Layer by right-clicking on the layer in the Layers panel and choosing “Hide Layer” or “Show Layer.” This allows you to quickly preview your changes with the Layer. Additionally, you can use “Duplicate Layer” to create a copy or “Delete Layer” to remove it.


Well, our quick lesson on editing is over for today! Now, you know how to add a watermark to your photos, sync your edits, and utilize Layers functionality like a pro. We hope you find the knowledge you've gained today useful and look forward to more articles from Team Skylum!
In the meantime, we recommend watching our YouTube channel, which contain a lot of useful information on editing, supported by visuals. See you soon!