Close-Up Portrait Tips: From Flat to Fantastic
September 03, 2024

This post guides you through enhancing your close-up portraits, ensuring every shot captures the essence and detail you aim for. Check it out to learn straightforward tips that can instantly improve your photography skills.
Have you ever attempted a portrait close-up, expecting a sharp, emotive image, but ended up with something less impressive? Perhaps the focus wasn’t quite right, or the lighting failed to do your subject justice. It can be disheartening when the photo doesn't reflect your intention!
We understand the challenge and are here to help. In this post, we’ll share essential tips that can improve your close-up face photography. With a bit of guidance, you'll be able to capture stunning, detailed portraits that truly satisfy!
Essential Equipment
 So, we're here to learn how to take better close-ups! Let’s start by talking about the equipment you'll need!
Lenses
Standard Zoom Lens: Something like a 70 mm - 200 mm is pretty flexible. It's good for taking pictures from different distances.
Macro Lens: This one's a must for the small elements. It lets you get up close to capture all those tiny details.
Telephoto Lens: Can’t get close? No problem. A telephoto lens lets you zoom in from afar, perfect for wildlife or distant subjects.
Additional Gear
Filters: These can help your camera see closer details, and they're cheaper than a new lens.
Extension Tubes: Pop one of these between your camera and lens, and you can focus way closer than usual.
Tripod: It keeps your camera still, which means no blurry shots.
Remote Shutter Release: This gadget lets you snap photos without touching your camera, keeping it steady and calm.
Lens Weather Cover: If you’re shooting outside and the weather turns, this will keep your gear dry.
Don’t forget to take these, and you’ll be set to shoot some awesome close-ups!
10 Tips For a Perfect Close-Up Portrait
 We prepared ten detailed tips to help you achieve great results in impactful close-up portraits!
1. Position Your Subject Near a Light Source
When shooting portraits, place your subject near a window. Have them face the window for gentle, even lighting or at a sharper angle, like 45 or 90 degrees, for more dramatic lighting effects that really make their facial features pop.
2. Get Close and Compose Your Shot
Zoom in close to your subject's face, paying special attention to the eyes. Position their eyes along the rule of thirds lines to naturally draw people into the most expressive parts of their face.
3. Fill the Frame
Try to fill your viewfinder with your subject's face to keep your photo free from distracting backgrounds. If you can't avoid the background, make sure it's out of focus or plain enough not to divert attention from your subject.
4. Slightly Over-Expose
Adjust your camera settings to over-expose the shot slightly. This technique brightens the skin tones and enhances the eyes. Use manual mode to tweak exposure settings, aiming to capture the best possible image straight out of the camera.
5. Photograph From Above
Position yourself slightly above the subject’s eye level and have them look up at the camera. This angle is universally flattering and helps illuminate the eyes, adding sparkle and life to the portrait.
6. Enhance with Accessories
Select accessories that tell a story or enhance the mood of the portrait. For example, a vintage hat can suggest a retro vibe, while simple, elegant earrings can complement and not overpower the subject’s features. Choose accessories that add to the narrative you’re trying to convey.
7. Create Interesting Lighting Patterns with Direct Light
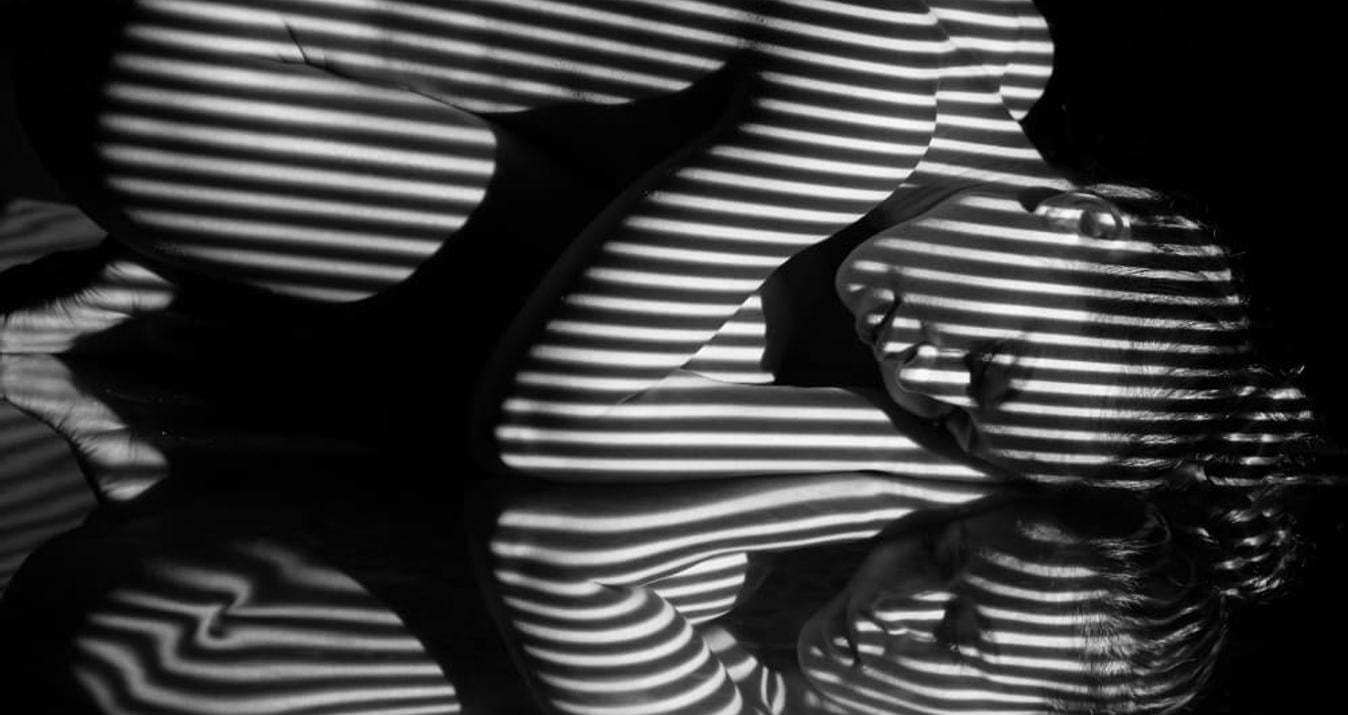
Use direct sunlight filtered through objects like blinds or leaves to cast patterned shadows across your subject’s face. These shadows add a layer of intrigue and can transform a standard portrait into a striking piece of art.
8. Use a Large Aperture for a Softer Focus
For a soft-focus effect, opt for a large aperture, like f/1.4. This setting limits the depth of field, blurring the background and focusing attention tightly on a specific part of your subject, like the eyes. To ensure precision in what you capture, switch to manual focus. This gives you complete control over which elements are sharp and which blend into softness. Conversely, if your goal is to have everything in the frame crisply defined, a smaller aperture, such as f/8, will increase the depth of field for a sharper overall image.
9. Capture Diverse Facial Expressions
Encourage a range of expressions by talking with your subject, making them laugh, or asking them to recall memories. This can capture anything from a thoughtful frown to a joyful smile, adding variety and depth to your portfolio.
10. Experiment with Creative Cropping
Play with different cropping techniques by focusing on less conventional parts of the face, like just the lips or one eye. This approach can make a portrait more mysterious or intimate, focusing on specific features that convey emotion effectively.
With these detailed tips, you'll be better equipped to create expressive and technically sound close-up portraits that capture the essence of your subject.
Editing a Close-Up to Perfection
Editing portraits is a crucial step in photography before you share your close-ups with the world. Aperty, an AI-powered photo editor, meets all the expectations you might have for refining your images. It comes equipped with an AI portrait editor designed to enhance facial features and skin tones effortlessly!
If you struggled to achieve a soft background blur, or bokeh, during your shoot, portrait bokeh feature can add this effect post-shoot, giving your portraits that sought-after professional look. Additionally, the crop AI tool we discussed can be incredibly useful for fine-tuning your composition, helping to highlight the most striking parts of your image.
With all these AI features at your fingertips, your portraits will transform into stunning pieces of art. Aperty ensures that the close-ups you present aren't just pictures but perfected portraits ready to impress!
Creative Close-Up Portraits
 Have you thought of spicing up your close-up portraits? Here are a few quick ideas!
Color Gels: Place colored filters over your lights to bathe your portraits in mood-enhancing hues. Check a color wheel to pick shades that pop together. This technique not only alters the ambiance but also adds emotional depth to your photographs.
Reflections: Use mirrors to play with your subject’s reflection. This can add an artistic twist, whether you're using shattered glass for a fragmented effect or a single mirror outdoors to capture natural scenes within the portrait. Reflections can multiply visual interest and create a captivating, layered look.
Contrast: Boost the visual impact by playing with contrasts. Put a dark background behind bright clothing, or use different shades of the same color for a subtle yet striking effect. This not only draws the eye but also emphasizes the mood you’re aiming to convey.
Anonymity: Hide parts of your subject with fabrics or objects. This adds mystery and makes viewers curious about the person behind the portrait.
Motion Blur: Slow down your shutter speed to blur movement, adding a sense of action to your shots. This dynamic element can convey emotion and energy, making your portraits come alive.
Prism Effects: Hold a prism in front of your lens to bend light and create dreamy effects like rainbows and flares.
Experimenting with these ideas can bring a fresh perspective to your photography and open up new possibilities!
Wrapping It Up
That’s a wrap on turning your close-up portraits from flat to fantastic. Equip yourself with the right gear, use lighting to your advantage, and don’t shy away from getting creative with color gels or reflections.
By positioning your subject strategically with regard to light, considering composition carefully, and using creative techniques like color gels and reflections, you can transform a standard portrait into a compelling story.
And remember, a touch of editing can go a long way — something as simple as tweaking the background blur with Luminar Neo can make a big difference. Now, go ahead and put these tips to use; your next great portrait is just a click away!


